
Runners are an interesting breed. Throw us together on a Saturday night and there may be whiskey and push-up contests. In the mornings, long runs leave much time for vocal introspection — no thoughts, no subjects are off limits. There’s the usual catch-ups of the previous evening or week, soul-bearing conversations of life and love, (literal) potty humor, and, of course, what we’d like to eat when the miles are finally at an end — or, in many cases, often after running past the wafting aroma of crispy bacon from a corner deli 10 miles into a 20-miler, right at that very moment. And thus, it was on one of those runs, several months ago, that a few of us started daydreaming about croissants. Marathoners, ultra-marathoners, and IronWomen in our crew, none of us shies away from a challenge. And so became “That Time We Made Croissants” — from scratch.
Let’s get this out of the way right here, right now: croissants are easy. Yes, you read that right. So long as you pay attention to the steps, the ingredients, the measurements, and the timing, anyone can make croissants. The trouble with them is that they take a ridiculous amount of time. Meaning, you need to devote an entire day to these bad boys. Not all of it is hands-on. Most of it is actually spent resting, chilling, and freezing the dough — there was time for us to go for a run, watch a movie (and drink wine), and go out to dinner (and drink wine) during three lengthy rest periods. In all, it took us about 11 hours from start to finish. And it was totally worth it.

Six of us scheduled a date and moved into Abby’s lovely apartment for the day — her kitchen table would be big enough for us to roll the dough to its lengthy dimensions. We used the latest recipe from America’s Test Kitchen/Cook’s Illustrated, which calls specifically for King Arthur All-Purpose Flour, for its higher protein content (and thus better structure), and European-style butter, which is higher in butterfat than your usual supermarket butter. This is crucial: the higher fat-to-water ratio not only makes it easier to work with the dough while you’re rolling and folding, but is what truly creates those flaky layers that make a croissant a croissant.
We started out with a basic enriched but relatively lean dough, using a small amount of regular ol’ unsalted butter (American-style is fine here), whole milk, yeast, flour, salt, and sugar. The dough is kneaded briefly in a stand mixer, left to rest, and then pressed out into a rectangle and refrigerated for 2 hours.
Then we made a butter block with that fancy European-style butter. This is the star of laminated dough — dough that has been layered, many times, with butter. We do this by folding and rolling the butter into the dough, then folding and rolling and folding again, turning the dough, rolling, folding, on and on, with a couple of rests in between. This recipe laminates the dough in three turns — no more, no less — creating 27 layers of buttery goodness.
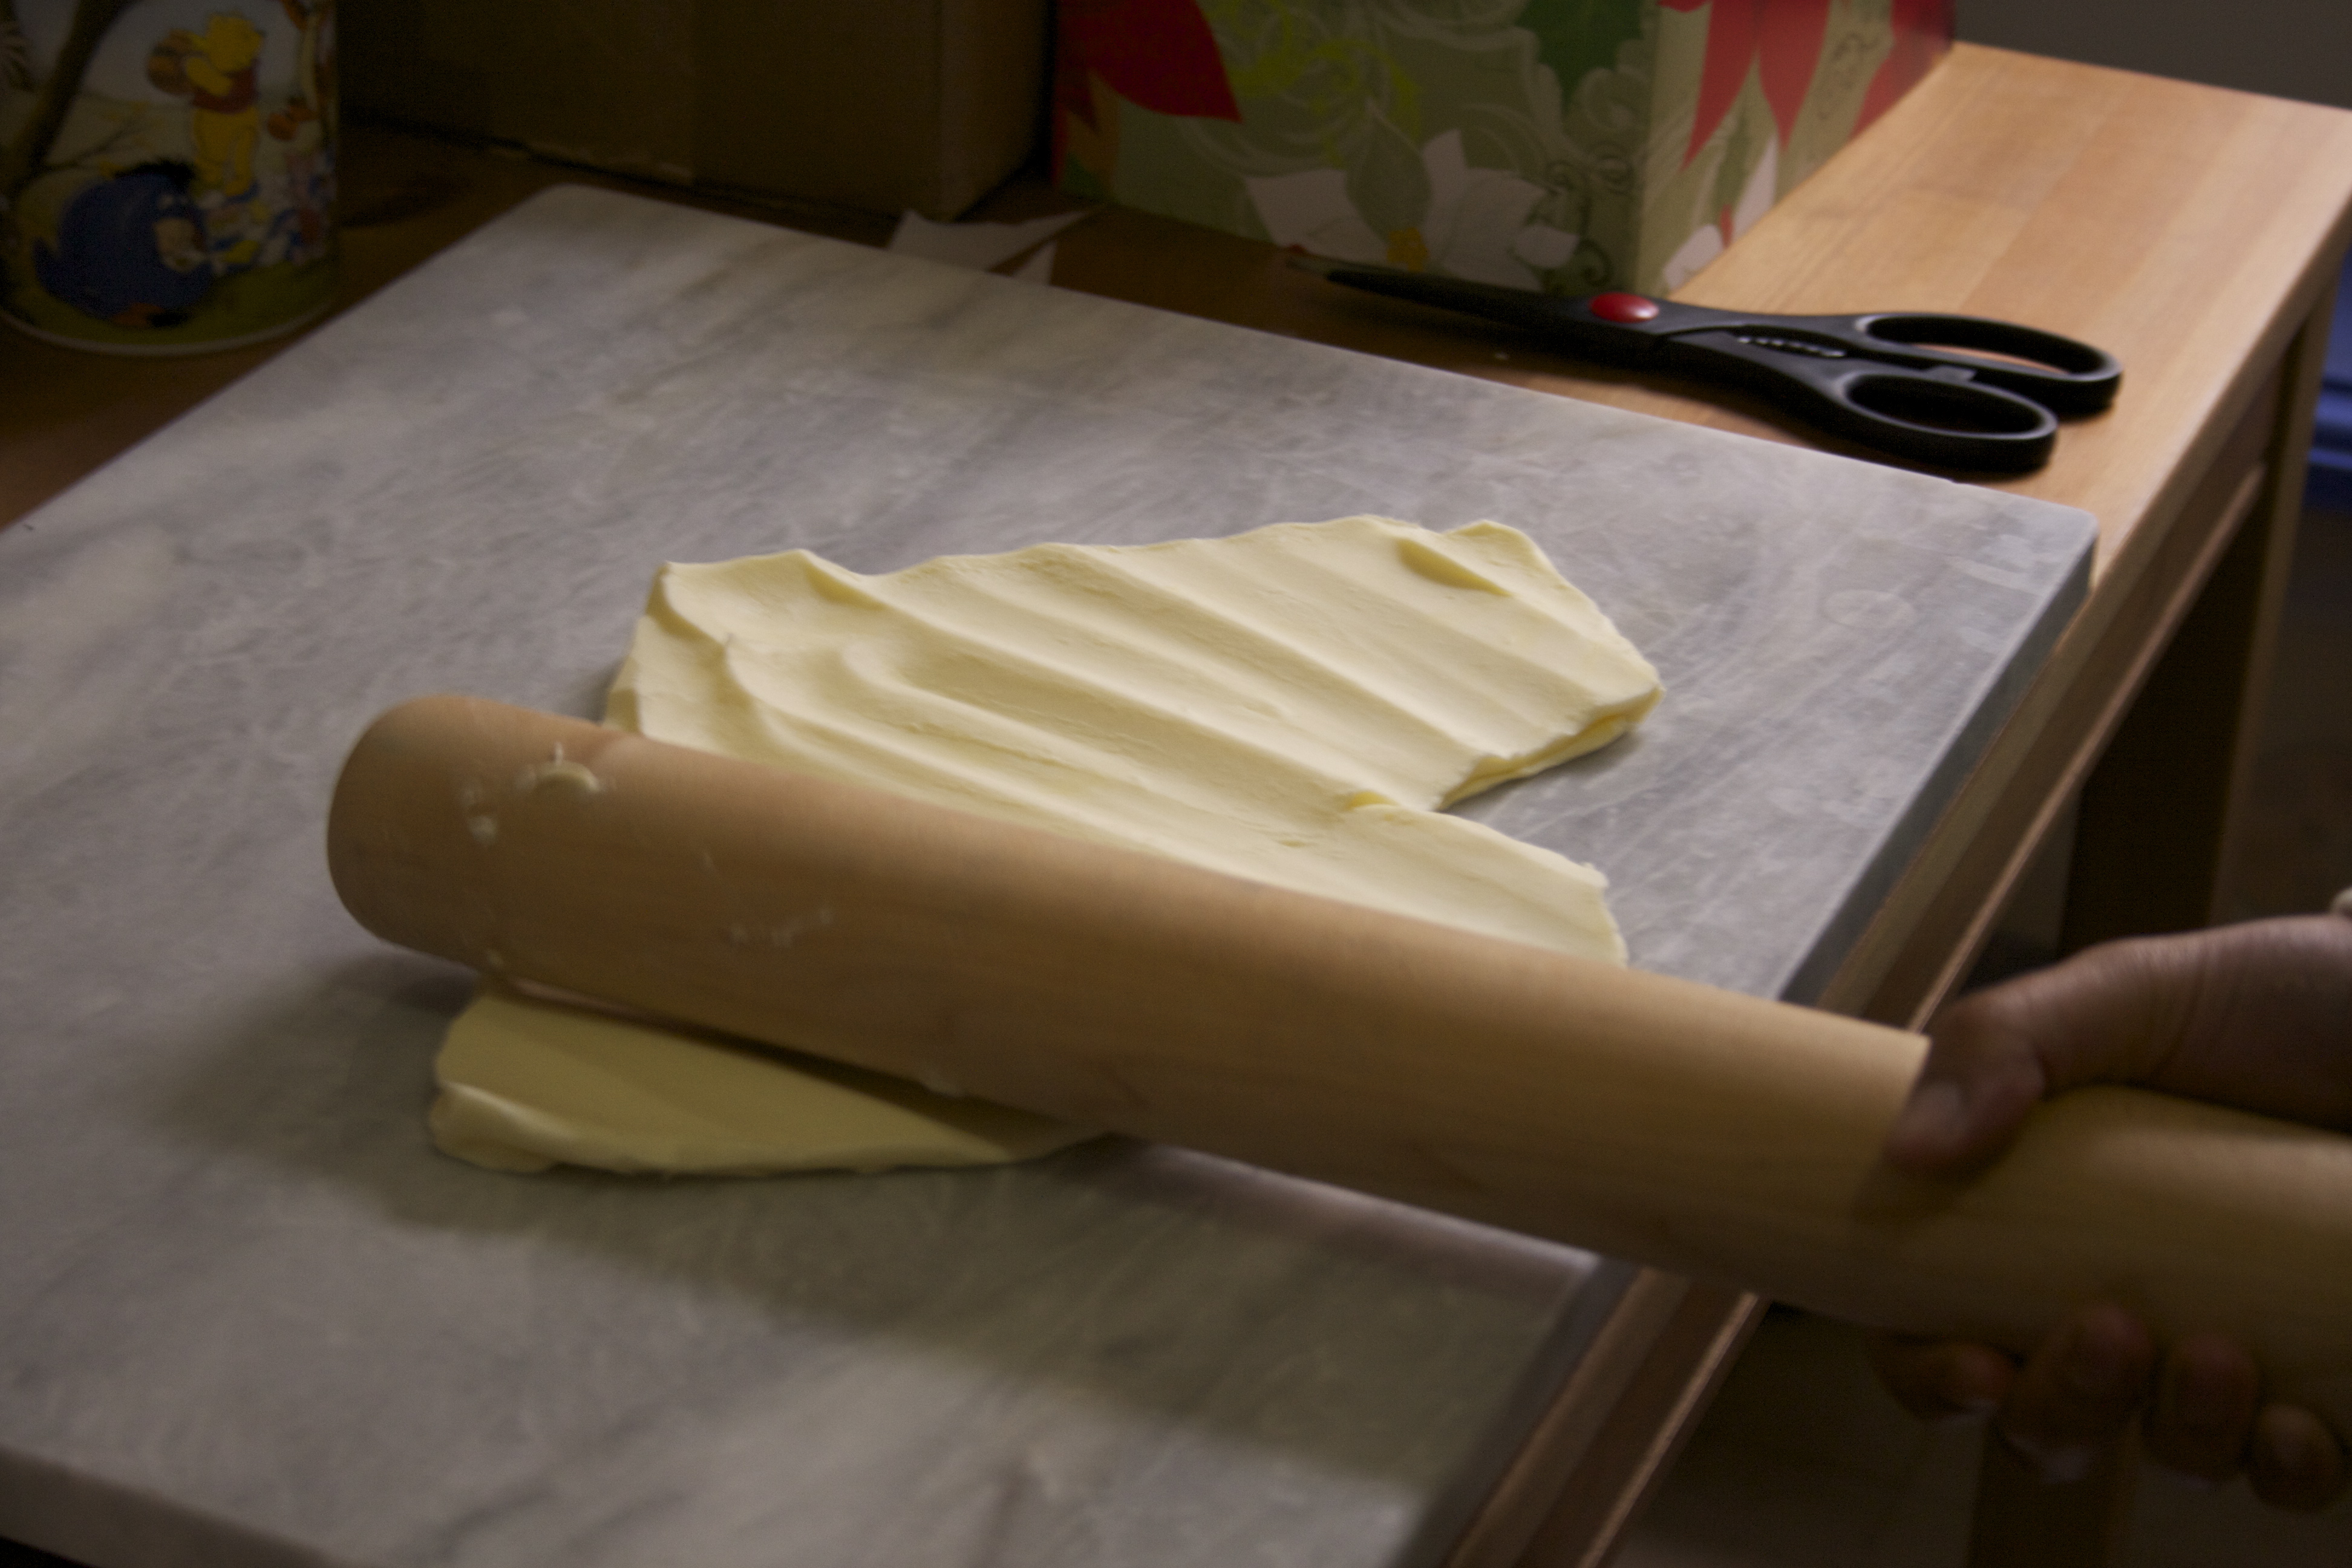


Back to the butter block: Katrina was nominated to beat 24 tablespoons of the cold butter with a rolling pin, then roll it within the confines of a square of parchment that is, essentially, an envelope. This creates the perfect shape to place in our dough when it’s ready, and the hands-off method means that the butter will stay relatively cold while you work it.
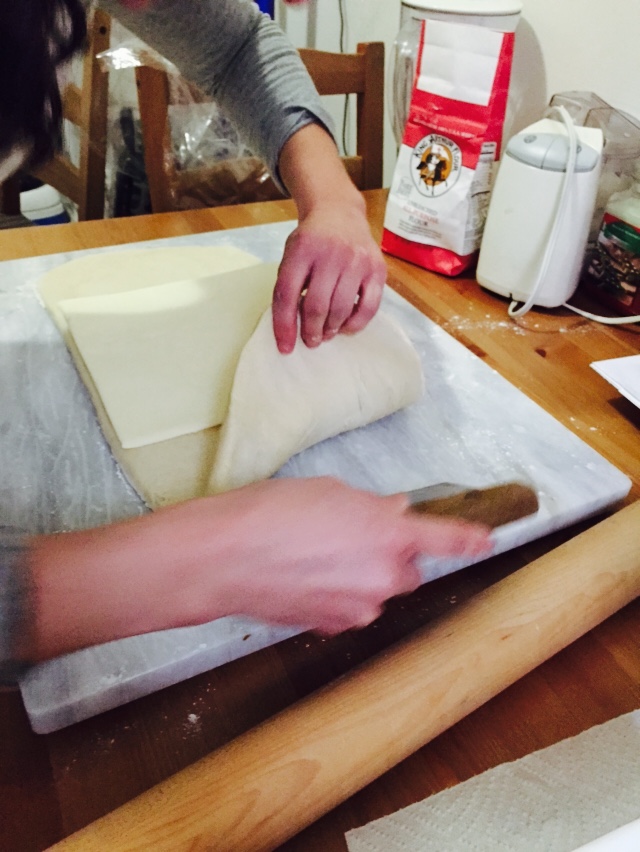
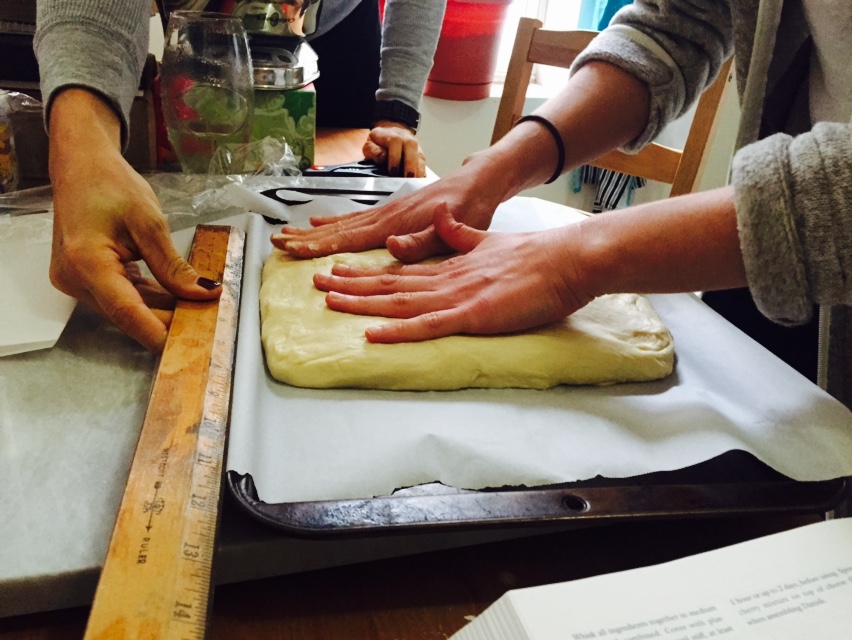
The butter block, or packet, chills in the refrigerator to firm up, and the dough is placed in the freezer for 30 minutes to bring it closer to the butter’s consistency. And this is where we start laminating: we rolled the dough on a lightly floured counter into a 17- by 8-inch rectangle — and here is where it pays to be precise. Get a ruler, pat out the sides as you go, square the corners, and measure, measure, measure. Do this for every roll and every turn. We placed the butter square in the center and folded the dough over it so that both sides met in the center.
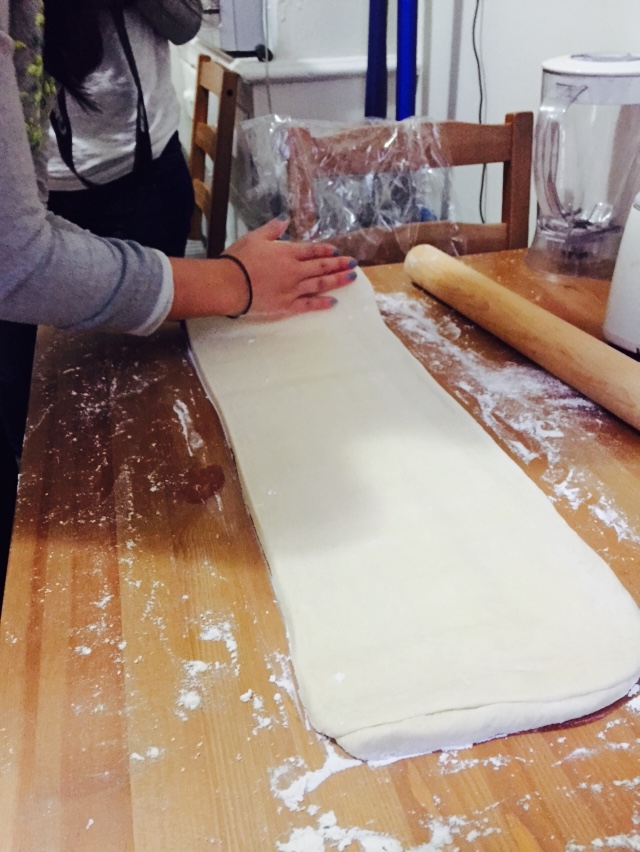
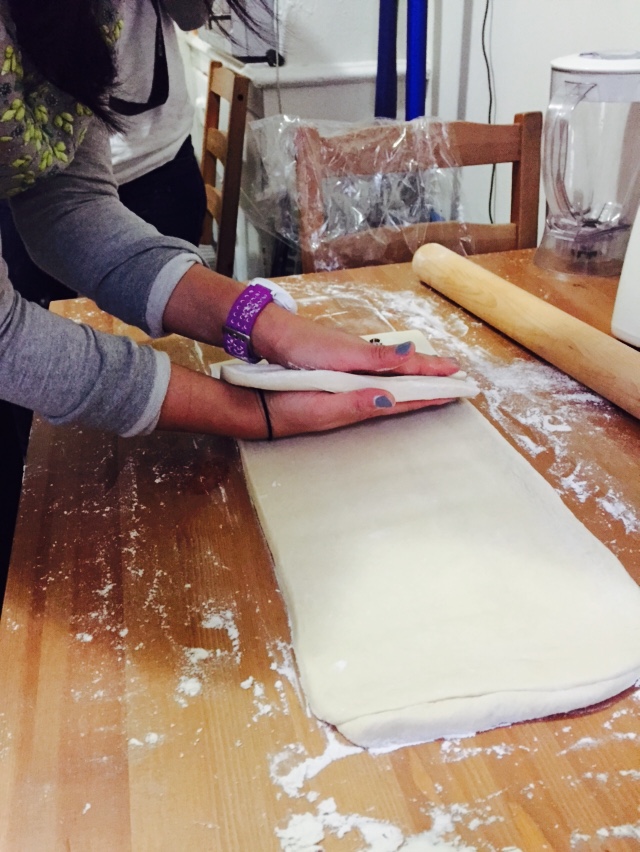
We rolled the now-butter-filled dough to 24 inches (keeping the 8-inch width), then folded it letter-style into thirds, turned it 90-degrees, and rolled it to the same dimensions and then folded it again.
 It’s put into the freezer to bring it back down to temperature and rest for 30 minutes. Then we rolled and folded it one more time, at which point it began to get harder to roll. Don’t be alarmed, that’s just the gluten formation creating more structure and, thus, more resistance.
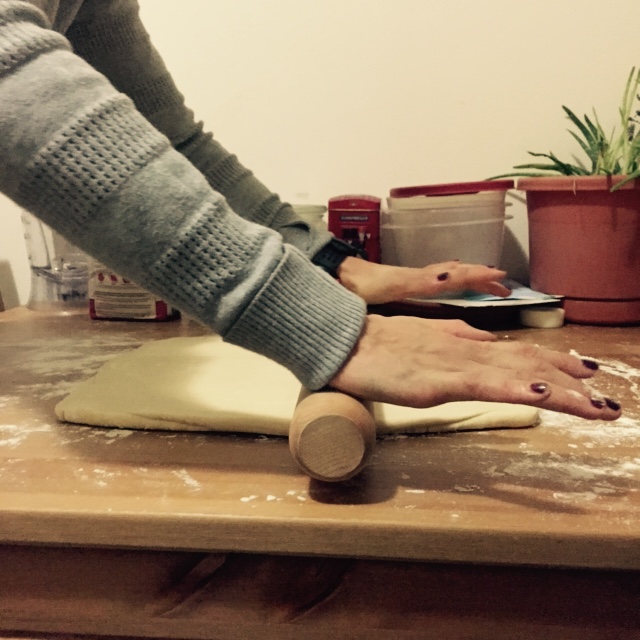
The dough is refrigerated one more time after the final turn, and then placed in the freezer for another 30 minutes. We then rolled the dough one last time into an 18- by 16-inch rectangle and, with the long side parallel to the edge of the counter, folded the top half over the lower half so that it measured 9 by 16 inches.

We measured and marked the dough at 3-inch intervals on the bottom (5 marks), and then 1 ½ inches in on the top and 3 inches thereafter (6 marks) — which we used to cut the dough on the diagonal into triangles. Because the dough is folded, you’ll end up with 12 triangles that will come apart easily, and 5 that are diamonds when you unfold and which you will have to cut. In total, you’ll have 22 triangles of the same size. We also unfolded the ends — the scraps — because we weren’t paying close enough attention, and made smaller croissants out of those, yielding a total of 26.
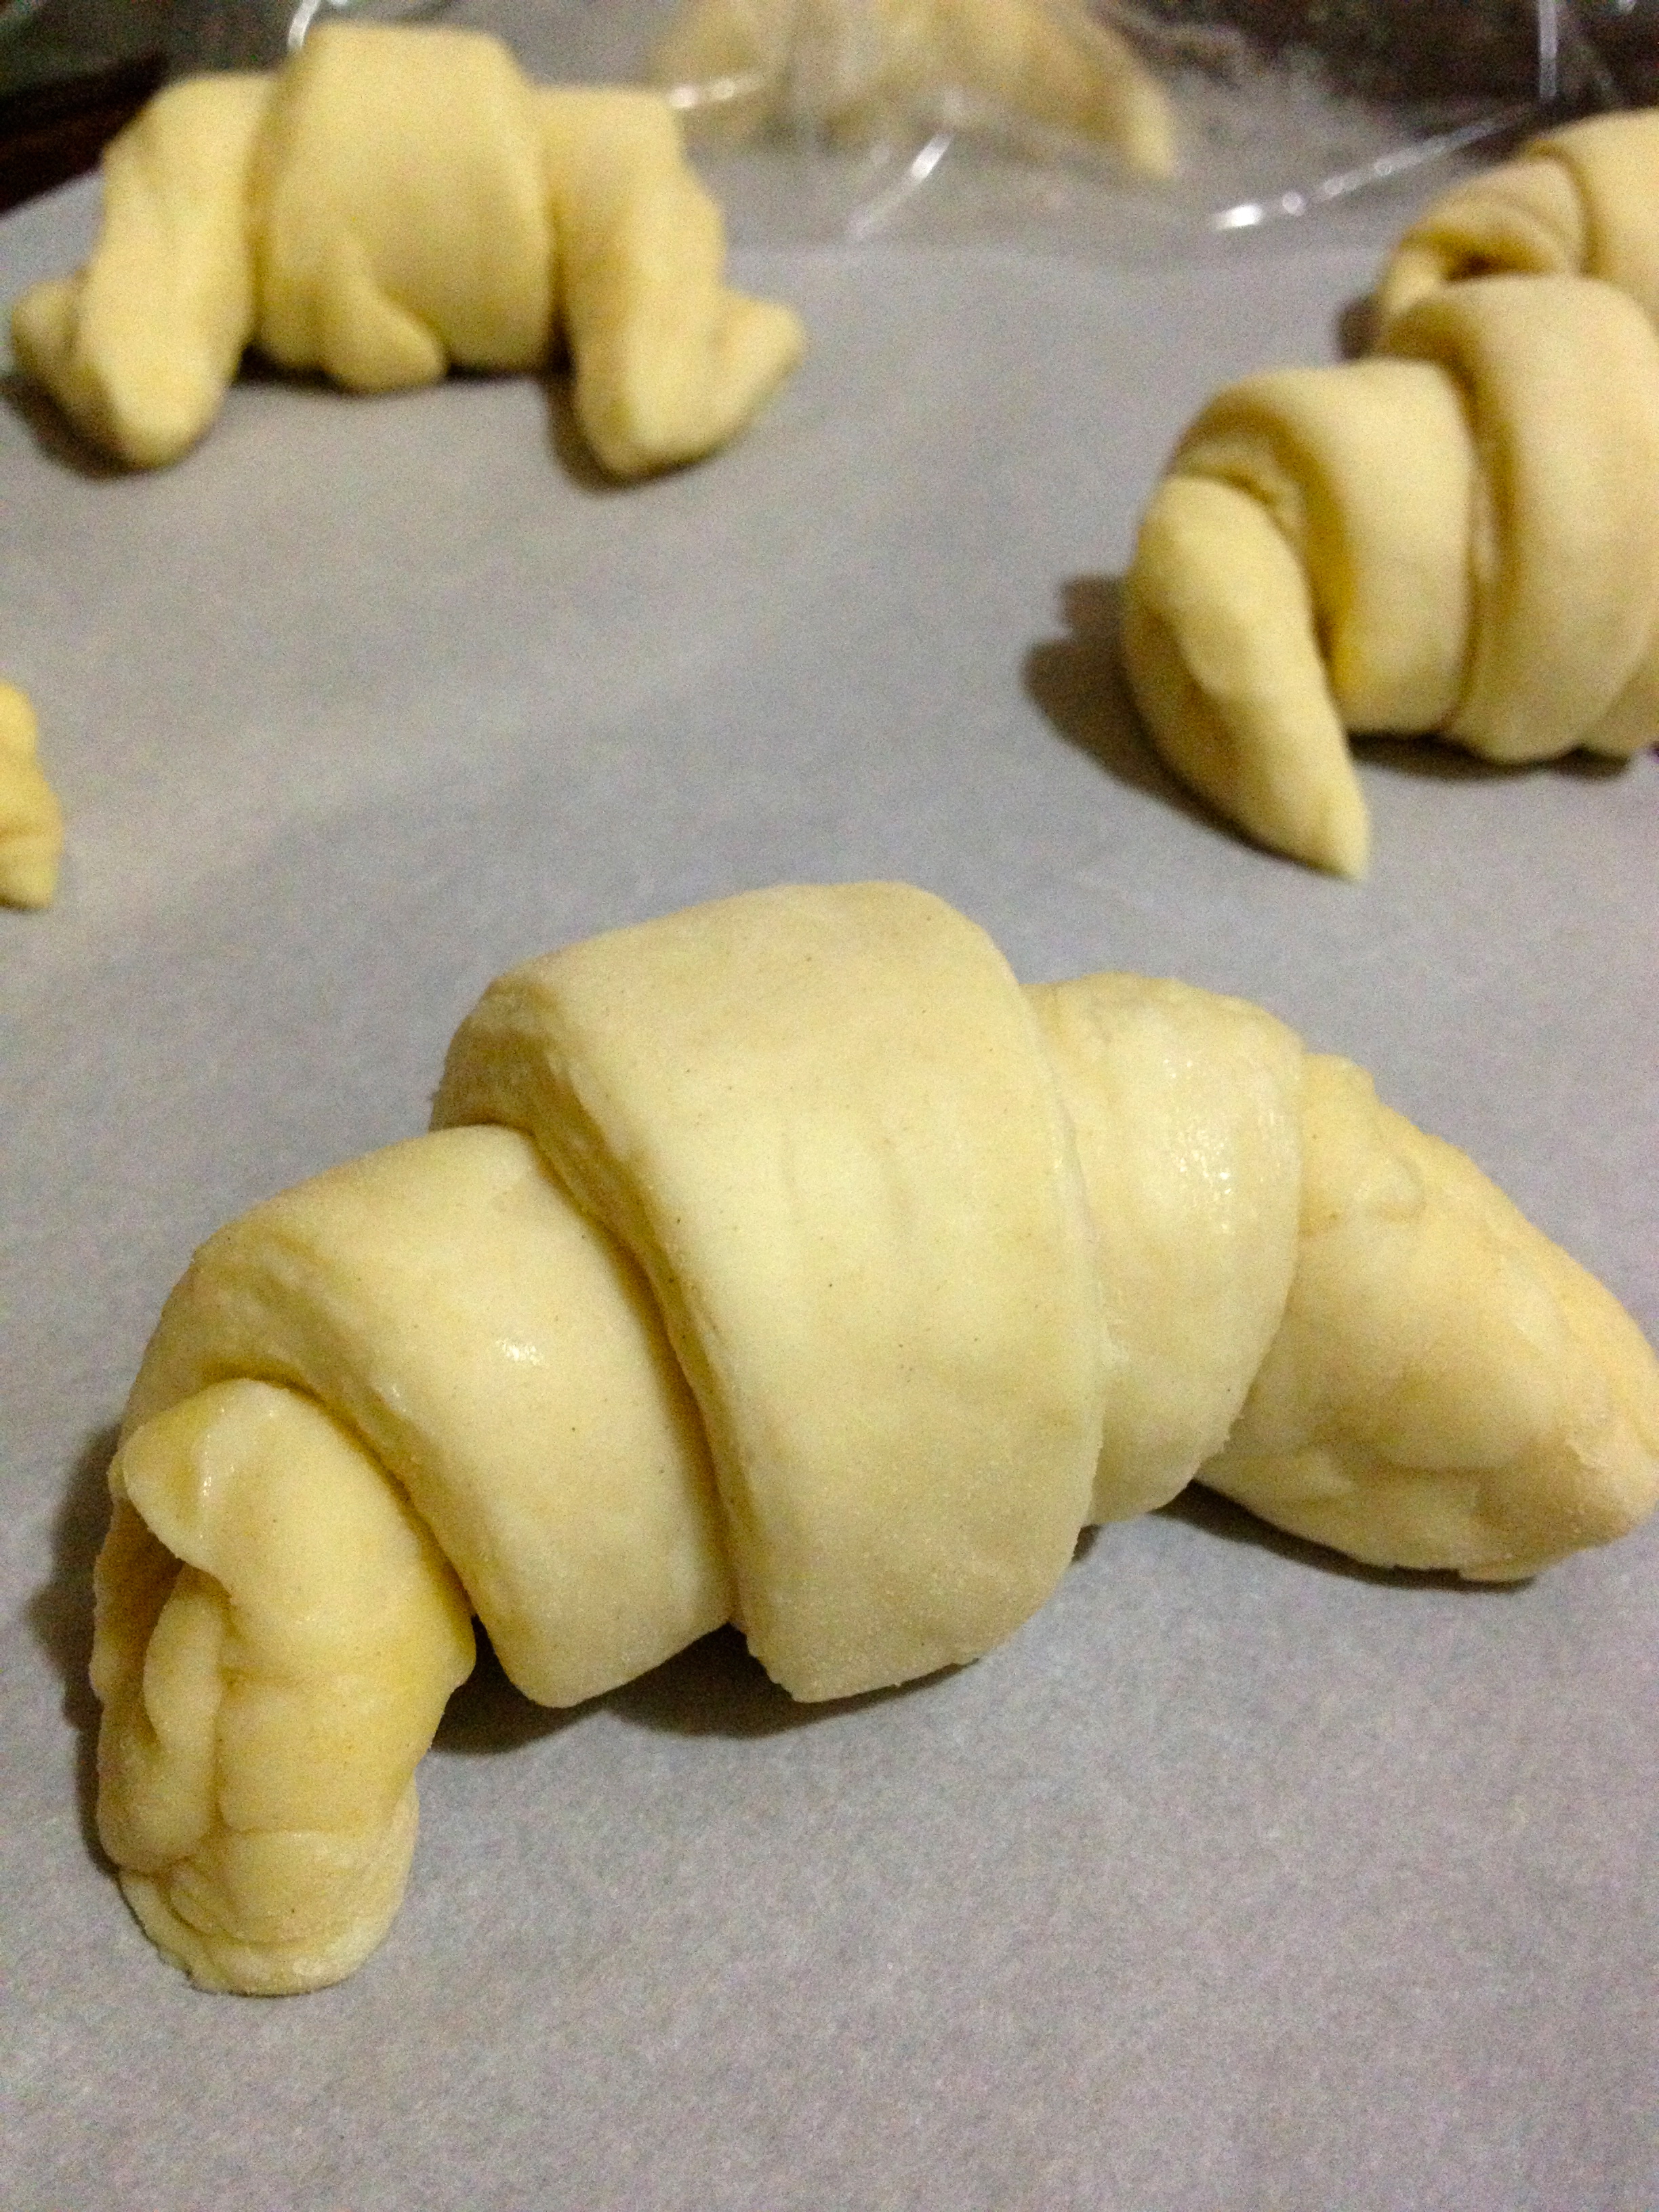
And then we brought them into being: we cut a ½-inch slit in the center of the base of each triangle, and stretched each side gently. We then started rolling each piece up towards the point. Halfway up, we grasped the point and stretched that gently, too, and kept rolling it, making sure the point ended up underneath. We curved the ends of each croissant gently towards one another to create the crescent shape. Voilà! We had croissants!
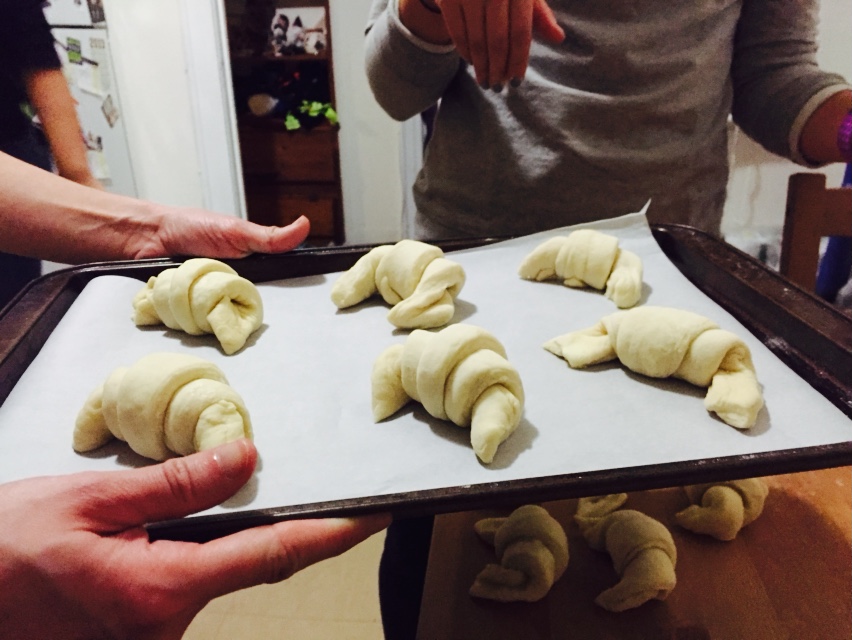
Twelve are then placed on two parchment-lined baking sheets and left to rest — and rise — at room temperature under a sheet of plastic wrap. (The rest are placed on a baking sheet in the freezer until solid and stored in a zippered bag — these can be baked later, the next morning, or anytime within two months.)

Our little beauties puffed up and doubled in size in about 2 ½ to 3 hours. If your kitchen is warm, like ours was, crack a window. Otherwise the butter may start melting and oozing out and you won’t get the same rise in the oven.

Just before the croissants go into a 425 degree oven, they’re brushed with an egg wash and a little love. The temperature is lowered immediately to 400 degrees. We baked the croissants for about 20 minutes, rotating the baking sheets about 12 minutes in. After just moments in the oven, the kitchen was filled with the scent of rich butter. The entire apartment began to smell like a boulangerie.

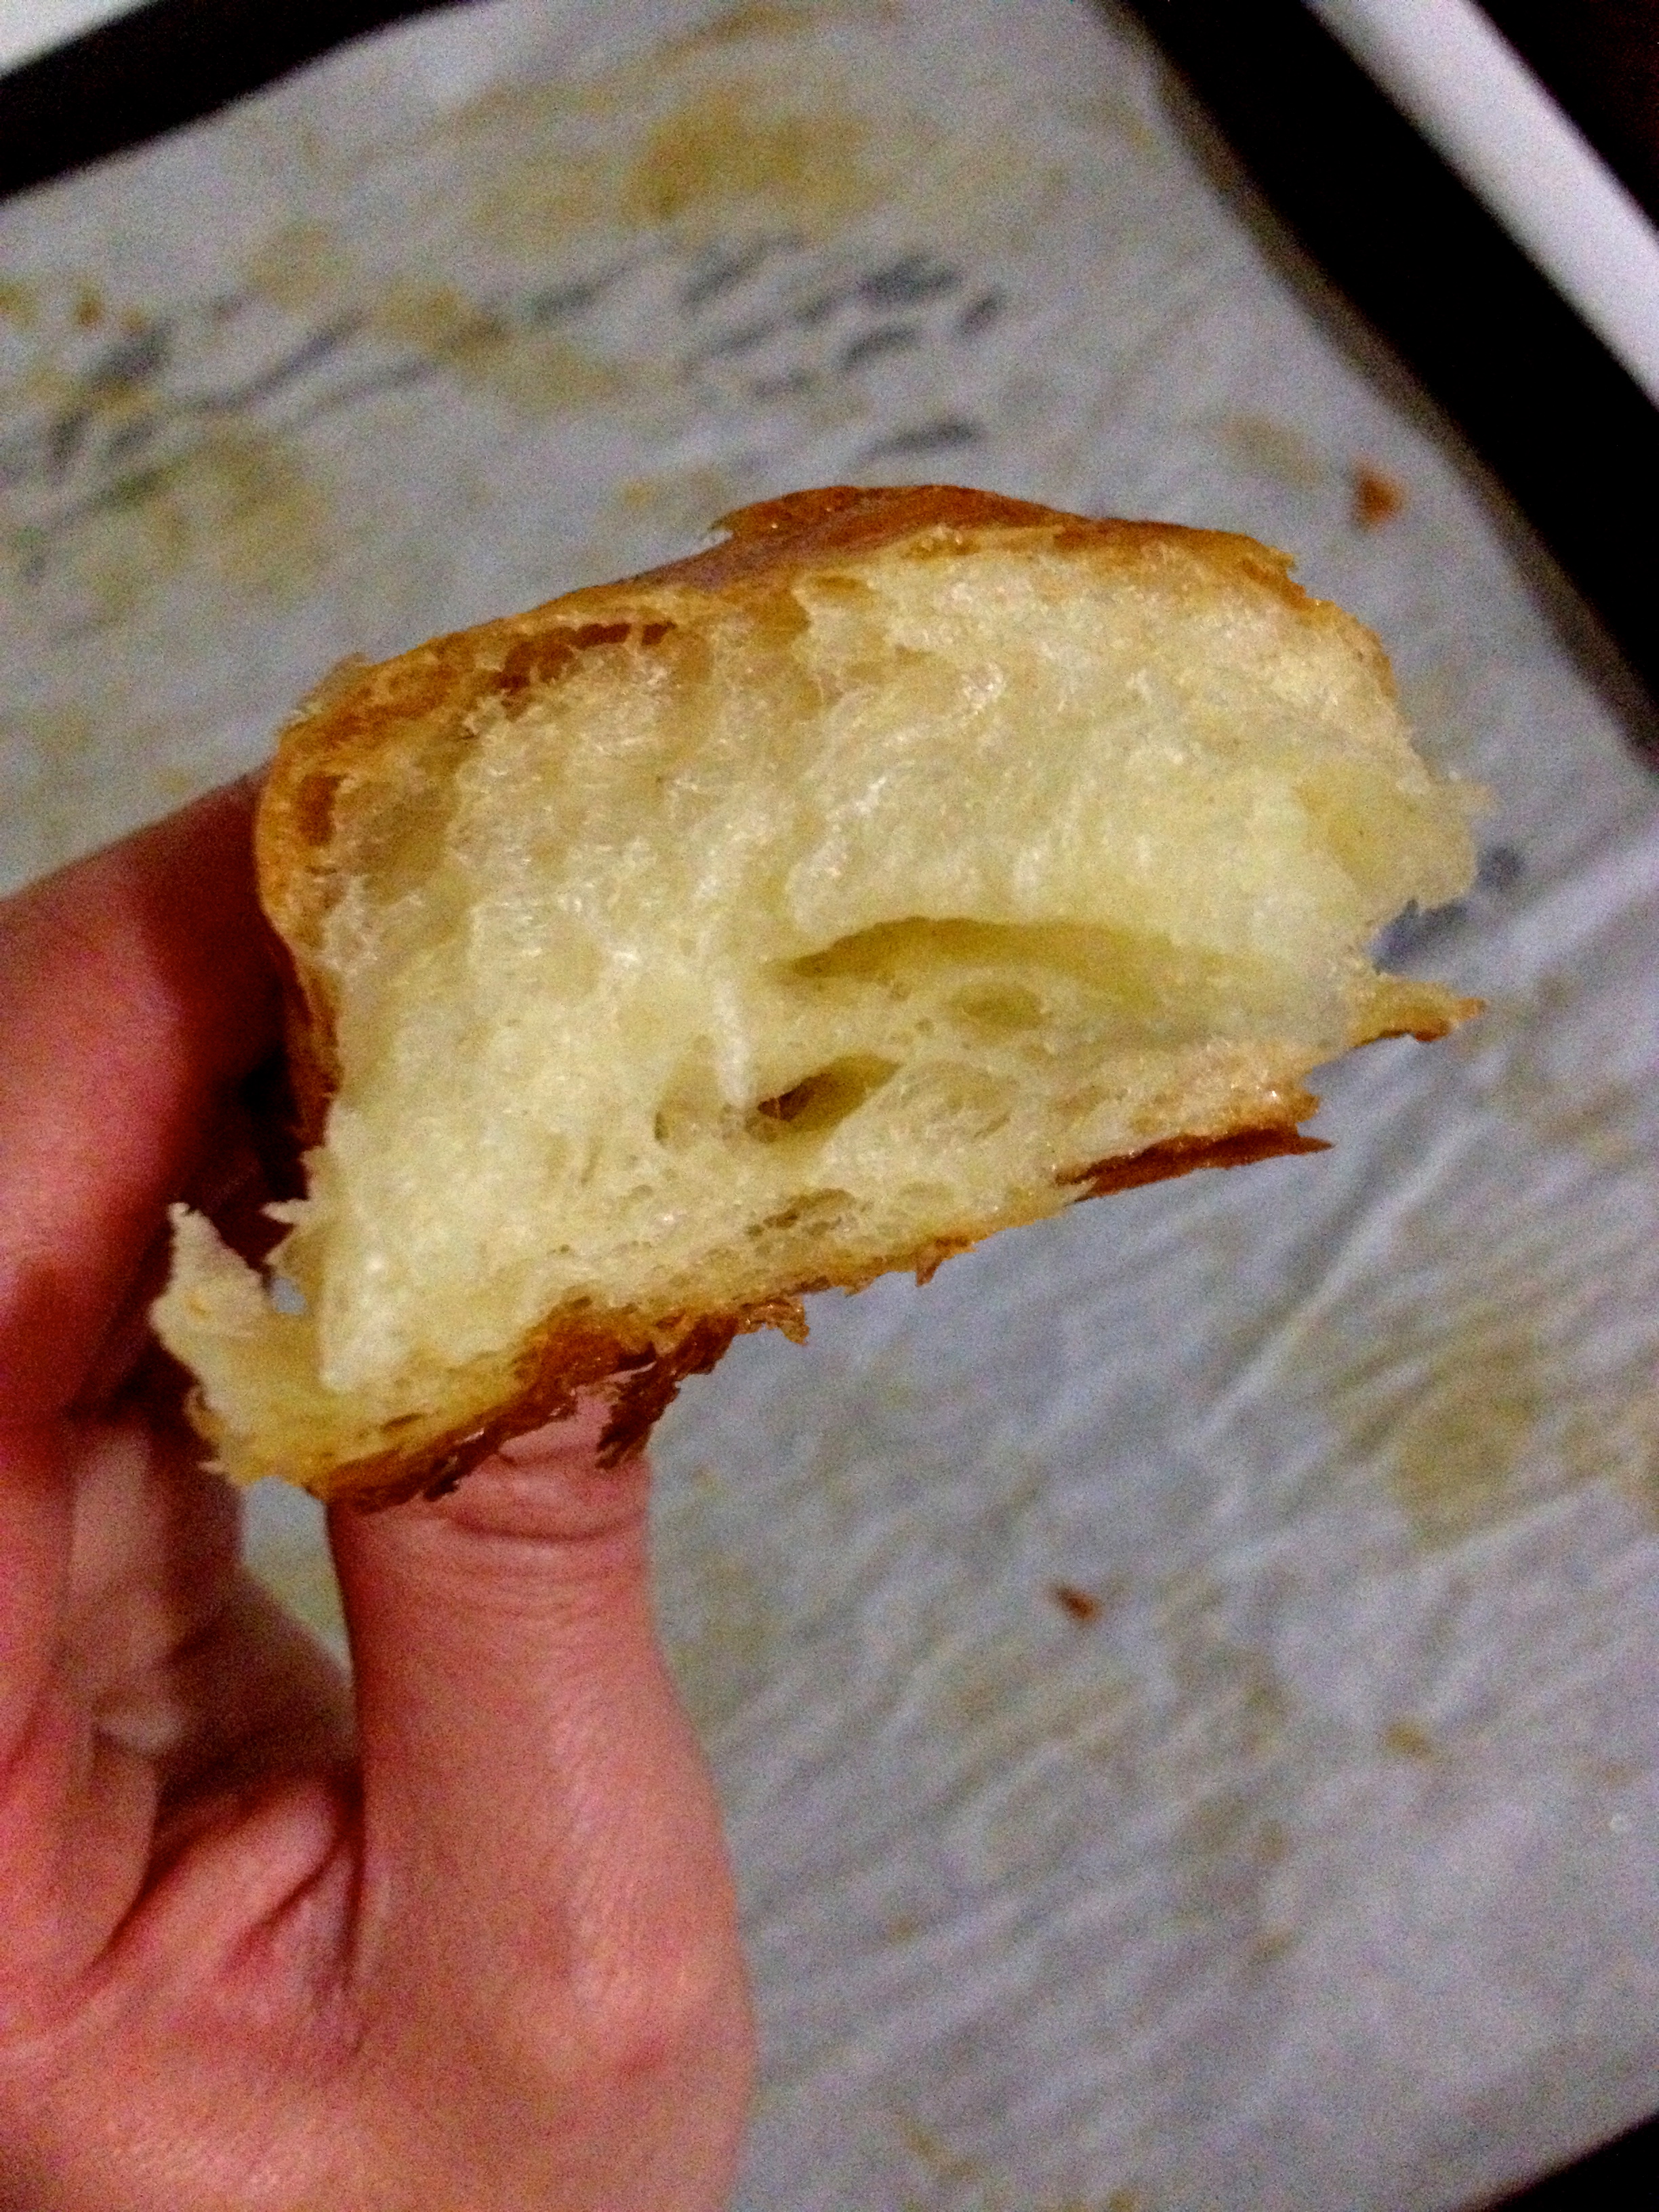
What came out of the oven wasn’t necessarily perfect — some of them were a little flatter than we had hoped, perhaps from the warmth of the kitchen — but they tasted perfect. The crust shattered in crisp shards as we pulled the ends apart. And the inside? Layers upon layers of decadent, tender, doughy crumb. Far beyond anything you might get at most eating establishments, these were CROISSANTS.
With the first bite I was immediately transported back to Paris, and Paris has been in my dreams ever since. We swooned into little puddles of joy. We danced and jumped and tried to capture their magic in words and in pictures. But all we could really do was devour them, inhale their scent, divide the frozen ones up, and make plans to create pains au chocolat or almond croissants next time. Sometimes long, hungry runs create monsters. We’re not sorry.

(huge thanks to Abigail Sole, Kimberly Roof, Katrina Soo Hoo, Miji Lee, and Julie Huntington for being my partners in crime, and to Abby especially for lending her apartment, and Kim for many of the photos)
Croissants
from Cook’s Illustrated
Two things to be aware of right off the bat: make sure you work with King Arthur All-Purpose Flour and a European-style unsalted butter (at least 83% butterfat — we used Plugra, as recommended by Cook’s Illustrated), and make sure you are able to devote an entire day to the process. You can leave while the dough rests, but don’t go too far and make sure you have a timer on you. This process is easy but it’s very precise. That also means you’ll need a ruler, parchment paper, rimmed baking sheets, space in both your refrigerator and freezer, enough counter space for a 24-inch rectangle of dough, and patience to make sure that your dough reaches the exact measurements prescribed. If, while rolling, it becomes too wide, pat it back in and make sure your edges are actually linear and your corners squared. And if at any point while you’re working the dough it becomes too soft, dust it with flour, fold it loosely, cover it, and put it back in the freezer for 10-15 minutes to firm up. You should ideally be working in a room that is no warmer than 75 degrees, but Cook’s Illustrated suggests no warmer than 80. The warmer you get, the harder it will be to get the result you want without extra refrigeration, and thus more time. As is, Cook’s Illustrated warns that it will take at least 10 hours. It took us 11, and I wouldn’t have wanted it to take more.
Another note: the croissants can be made ahead, but not until after they’re shaped. Shaped croissants can be refrigerated on parchment-lined baking sheets (wrapped loosely in plastic) for up to 18 hours (let them rise an extra 30 minutes prior to baking). Alternately, and because according to the recipe only 12 are baked off at once, croissants can also be placed one inch apart on parchment lined baking sheets, wrapped with plastic, and frozen until solid, about 2 hours. Transfer frozen croissants to zippered bags and return to the freezer for up to two months. Frozen croissants can be baked as directed in the recipe, increasing the rising time by 1 to 2 hours.
yield: 22 croissants, plus 4 scraps that can be made into mini croissants
3 tablespoons unsalted butter (for the dough)
24 tablespoons (3 sticks, or 12 ounces) European-style unsalted butter, very cold
1 ¾ cups whole milk
4 teaspoons instant or rapid-rise yeast
4 ¼ cups (21 ¼ ounces) all-purpose flour
¼ cup (1 ¾ ounces) sugar
2 teaspoons salt, plus a pinch for egg wash
1 large egg
1 teaspoon cold water
Make the dough:
Melt 3 tablespoons of butter in a medium saucepan over low heat. Remove the pan from heat and immediately stir in milk — don’t heat it, just swirl it around or stir it with a spoon to bring it up to temperature a bit to help the yeast. Whisk in yeast, and transfer the mixture to the bowl of a stand mixer. Add flour, sugar, and 2 teaspoons salt. Using a dough hook, knead the dough on low speed until the mixture becomes cohesive, about 2 to 3 minutes. Increase speed to medium-low and knead for 1 minute. Be careful not to go any longer or else you’ll develop the gluten too rapidly. Remove bowl from mixer and cover with plastic wrap. Let rest at room temperature for 30 minutes.
Transfer dough to a parchment-lined rimmed baking sheet and press into a 10- by 7-inch rectangle about 1 inch thick. Wrap tightly with plastic and refrigerate for 2 hours.
Make your butter block:
While the dough is chilling in the refrigerator, fold a 24-inch length of parchment paper in half to create a 12-inch rectangle. Fold the 3 open sides of the rectangle over to form an 8-inch square with enclosed sides. Crease folds firmly and set aside. Place 24 tablespoons of cold, European-style butter directly on counter and beat with a rolling pin for about 60 seconds, until the butter is just pliable but is not warm, folding the butter in on itself with a bench scraper to create a rough 6-inch square. Unfold parchment. Transfer the butter to the center of the parchment square using a bench scraper, and re-fold at the creases to enclose. Turn the packet over so that the flaps are underneath and gently roll the butter packet with your rolling pin until the butter fills the parchment square, taking care to ensure it is even throughout. Refrigerate at least 45 minutes.
Begin laminating your dough:
Transfer dough to freezer. After 30 minutes, transfer the dough to a lightly floured counter and roll into a 17- by 8-inch rectangle, with the long side parallel to the counter. Unwrap butter block and place it in the center of the dough so that the butter and dough are flush at the top and bottom. Fold 2 sides of the dough over the butter square so that they meet in the center, and press the seam together with your fingertips. Using your rolling pin, press firmly on each open end of the packet. Now roll out the dough perpendicular to the edge of the counter, with the open ends at the top and bottom, to a rectangle measuring 24 inches long and 8 inches wide. Fold the bottom third of the dough up, then fold the upper third over it, folding like a business letter into an 8-inch square (first turn). Turn the dough 90 degrees clockwise. Roll out the dough again, perpendicular to the edge of the counter, into a 24- by 8-inch rectangle, and fold again into thirds (second turn). Place the dough on a baking sheet, wrap it tightly with plastic, and return to the freezer for 30 minutes.
Transfer dough to a lightly floured counter so that the top flap of the dough is facing right. Roll it out once more, perpendicular to the edge of the counter, into a 24- by 8-inch rectangle and fold into thirds (third turn). Place dough back on the baking sheet, wrap tightly with plastic, and refrigerate for 2 hours.
Transfer dough to freezer. After 30 minutes, place dough on a lightly floured counter and roll into an 18- by 16-inch rectangle with the long side parallel to the edge of the counter. Gently fold the upper half of dough over the lower half. Using a ruler, mark the dough at 3-inch intervals along the bottom edge with a bench scraper (for a total of 5 marks). At the top of the dough, measure in 1 ½ inches from the left, and then use this mark to measure out 3-inch intervals (for a total of 6 marks). Starting at the lower left corner, use a pizza wheel or knife to cut the dough into triangles from mark to mark. Unfold each triangle — you will have 12 individual triangles and 5 diamonds. Cut those diamonds in half for a total of 22 triangles. You can discard the scraps or use them to make mini croissants.
Shape the croissants:
Cut a ½-inch slit in the base of each triangle. Working one triangle at a time, keeping the rest covered with plastic, grasp the base of the triangle on either side of the slit, and stretch it gently. Grasp the point of the triangle and stretch that gently as well. Place the triangle on the counter and begin rolling up towards the point. Halfway up, gently grasp the point and stretch it again. Continue to roll, tucking the point underneath. Curve the ends gently toward one another to create the crescent shape. Repeat with the remaining triangles.
Place 12 of the croissants on 2 parchment-lined baking sheets, leaving at least 2 ½ inches between croissants. You should have 6 croissants on each sheet. Wrap each sheet lightly with plastic wrap, leaving room for the croissants to grow. Let the croissants rise at room temperature until they’ve nearly doubled in size, about 2 ½ to 3 hours.
After croissants have been rising for 2 hours, adjust 2 oven racks to upper-middle and lower-middle positions and preheat to 425 degrees. In a small bowl, whisk together the egg, water, and a pinch of salt. Brush croissants gently with egg wash using a pastry brush. Place croissants in the oven and reduce the temperature to 400 degrees. Bake for 12 minutes, then switch and rotate baking sheets. Continue to bake until croissants are a deep golden brown, 8 to 12 minutes. Transfer croissants to a wire rack and let cool until just warm, about 15 minutes. Serve warm or at room temperature.
3 Comments